Thursday, May 31, 2012

Breakfast Tacos in Bulk

I debated whether or not to even write this guy because this seems so simple to me, but what the hey! Maybe there are some of you out there who could use a simpler version of cooking breakfast tacos. Excuse the low quality photos, por favor.

Previously, I told you guys how we managed to move to a new place and not lose our minds in the process. One part of that was to keep food around for ourselves and the helpers to eat when their tummies beckoned for nourishment. This is so simple that it can be upgraded with just a few additions, like chopped veggies.


When I plan out portions for breakfast tacos, I give everyone two eggs. I also portion one package of sausage to a dozen eggs. For us, we always have a big pack of flour tortillas on hand, so when the goods are done cooking, I fill those until there are no more left to fill. With 1 package of sausage and a dozen eggs, that can be about 50 breakfast tacos. We also had salsa and shredded cheese for people to put on their breakfast tacos, if they desired.

I cooked them in my big cast iron skillet - first browning the sausage, then adding in the dozen eggs after I had whisked them together in a separate bowl. Tortilla on foil ready to wrap it all together completed the burrito. I got about 50 with the portion size shown above. And they were a success. Ones that were not eaten moving day were saved in the fridge for The Mister to grab and eat before work.

Lola - at this point was displaced to the kitchen because every other place was filled with boxes. She was perturbed that I was in her space. And maybe she was hoping some would fall on the floor.

Wednesday, May 30, 2012

This Blog


Hey readers!

So, I told you guys yesterday about my life and laptop cord issue that kept me away, and now it seems that I am making up for lost time by repeatedly changing the design of the blog! So I want to apologize if you are running in to issues browsing through posts and what not. Being that this is a hobby, and not a business for me, I don't have funds to get one of those pro web designers to make my blog look awesome, so I customize the regular blogger templates to my liking. I think the latest (no background image, green, yellow, and blue colors) is one I will stick with for a while.

If you frequent this blog (or have only come once or twice and dig what you see), I want to make this one time request that you follow me, or subscribe to receive the blog posts by email. Love you guys.

--Tiffany, The Missus

DIY Greeting Card Keepsake


Gift cards are given for a number of occasions and reasons. Normally, when we receive a card it is read, laughed/cried/smiled over, a thank you is written, and the card is placed in a box with all other cards. No organization, no rhyme or reason to how they are arranged. But after seeing this wedding mini album from Something Turquoise...

Wedding Card Mini-Album from SomethingTurquoise.com

I wanted to change our system. And it would begin with our cards from our wedding and the wedding shower (which is appropriate because of our one year anniversary Monday).

**Please excuse my very dirty rug - Lola hair is visible, I'm embarrassed, but now I'm over that. In case you are in doubt, we do, in fact, own a vacuum.


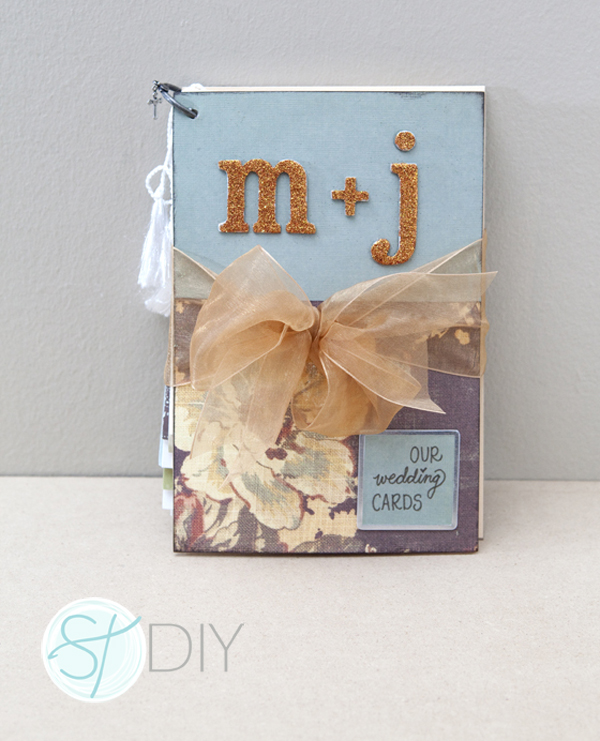
I sorted through the box and pulled out all of our wedding cards. I also pulled out left over materials from when we made the various paper goods for the wedding, including our trusty customized stamp. Then, I just followed their tutorial, with a few changes to suit my needs.

I chose to use cardboard over card stock for a firmer cover to my mini album. But it is difficult to cut cardboard with a straight edge (and when you cut it, you see the inside form, which isn't super pretty). I sorted through and looked for the largest card to use as the stencil. At the last second, I also chose to include an invitation from our wedding, which was the largest, and therefore the stencil for the size of the mini album.


 To hide those edges, I decided to wrap the cardboard with card stock like a present. 


Then, some tacky glue secured the paper to the cardboard, and our stone coasters held them in place.


It is still a semi-work in progress. I like to sit with certain things and just tweak until I feel it is complete. There may be some aging still to do on the corners and what-not. But, for now, we reflect on all of those wonderful people and their sweet words as we celebrate a year together.


I'm participating in a link party at The Sasse Life. Click the button above to see the featured crafts and find more projects for yourself to get busy with!

Tuesday, May 29, 2012

How To Move Without Losing Your Mind


Moving causes a wide range of emotions, and this time around, all I could think about was our last move. That entailed moving The Mister's things from his place, and my things from my place to our new place together. And we were silly and didn't ask for help. And since both of us drove a small car, we didn't think about how we would need a truck until the last minute and rented a truck. All of this cause a lot of tension and a few heated moments between us because I do not do well when things are not organized and Chris does not enjoy seeing me aggravated.


This is the chaos we lived in as we packed up and lived in our old place. Lola was not happy... her hang out spots were quickly being filled with boxes. All of the boxes were from Chris's work.


So this time around, we asked friends for help. And borrowed some of those friends trucks. And enlisted more said friend's advice in how to have an organized move. So, with the advice of her Nana's moving system, the number system was born.

Kitchen box!

Most ghetto wrapped box. There were fragile items inside, so I didn't want to put too much pressure on it, so I taped around the bulges that the box made. It was laughed at quite a few times.

The Mister had the task of taking apart our bed the night before moving.


Each room had a number, so its corresponding boxes were labeled with a number (as well as a detailed list of its contents). The labels were originally written on pieces of paper to save the boxes for others to use later, but I got lazy half way through and just started writing on the actual box (like a normal person, I know). At the new place, those numbers were hanging on the walls for boxes to be stacked underneath. Big pieces of furniture received their own label on the wall. For example, the couch went under a big piece o' paper in the living room that said "COUCH." There were many good things said about the system. And the moving only took about 2 trips (due to the plethora of vehicles) and 2 hours (due to the plethora of helping hands).


Then there is the comfort measures and the logistics to think about. We supplied breakfast tacos (how to on making bulk breakfast tacos to follow) and fruit for a before bite-to-eat. Then we bought pizza and had it delivered for the after thank you and bite-to-eat. There were extra water bottles we had filled and offered to everyone and a cooler that sat out on the counter for everyone to refill their water bottles.


I kept a little box with me that held extra slips of paper, tape, scissors, a map of the new complex, and a map of the layout of the new apartment that had the rooms numbered. Previously, I told you guys about our purging, and that continued while we filled up boxes. But we weren't able to drop all of those things off at the donation box, so they received a label that said "I'm staying!" and were placed in the bathroom where no other boxes were to keep down the confusion. We also left some spackle, trash bags, paper towels, and all-purpose cleaner behind to help with the final cleaning of the old place (to make sure we didn't lose our deposit).


Our moving day was pretty stress free. Any other tips on how to have a low stress, organized moving day?

Green Thumb Part 1

It has been much too long since my last post. Life has been happening - moving, finals, graduation (finally!), and then my laptop cord died which made accessing all of my posts and photos impossible. So I am sorry for the extended absence. Let me catch you up on the happenings around our household!

First, I would like to tell you how I DESPERATELY want a green thumb, but it seems that I do not have one. I love cooking with fresh herbs, and since our new apartment has a decent sized patio, we decided to try our hand at growing some. So here is part 1 of this long journey.


We wanted to be hardcore and start our garden from seeds (because that is what "real" gardens are made of) so we went to Lowe's and purchased a Jiffy seed starter kit and some of our favorite seeds - cilantro, sweet peppers, and jalapenos for The Mister (because he wanted a full on vegetable garden), and parsley, basil, rosemary, and thyme for me.


We followed the directions on the seed starter kit and happily tucked our little seeds in to their new beds. I just used a sticky note underneath the container to show what was planted where. And we coddled and cuddled and cared for these babies.


But that Texas sun is not forgiving. And we didn't plant soon enough for our little seedlings to have a chance. The jalapeno plants sprouted quickly and began to push off the cover, so many of the other seeds didn't have the humid environment long enough to sprout. Then, attempting to "harden" the plants by slowly exposing them to the elements caused those jalapenos to fall over (because they got too tall, too fast) and the little guys who had only begun to sprout to die.

It was a sad day when we admitted that they were a lost cause. So we forgot about them while we moved. Our lesson here, ladies and gentlemen, was to plant AS SOON AS POSSIBLE. We live in Texas, after all, and the likely hood of cold fronts after February is near impossible, especially in the DFW metroplex. Anyone else have a climate that puts obstacles in your way when you just want to be able to pick some fresh basil to make a yummy margherita pizza?